
Roki: Chapter 2 – Stag Dungeon Walkthrough
Table of Contents
You will find everything you need to complete the Stag Dungeon in Roki’s second chapter via this walkthrough.
You Are Reading :Roki Chapter 2 Stag Dungeon Walkthrough

Quick Links
Roki follows a girl named Tove who travels through ancient lands to rescue her younger brother from the fairytale monster, Roki. Tove will solve many complex puzzles throughout her journey, meet new friends and even face off against terrifying foes looking to prevent her from reaching her brother.
This guide will cover all the steps you need to take to reach the Stag Dungeon and how to complete the dungeon itself. This dungeon is the finale of Roki’s second chapter, which means you must finish everything else before starting it. You can find the other Chapter 2 walkthroughs here, including the other dungeons.
Obtaining The Mask Of Invisibility

Before we dive into the Stag Dungeon Walkthrough, there are a few things you need to do first. You should have most areas unlocked by this point in the story, so the guide will be assuming you have some items and have been to some areas already.
The first order of operations is to head to the Poisoned Forest and down into Shroomi’s Laboratory. If you only grabbed the trowel here in your last visit, take everything else in the room to have Shroomi talk to you and ask you to find some ingredients for a recipe. The Ingredients include a Ram Skull, Beard Hair from a Mother Kroke, and 2 Nattamare Parasites.
Nattamare Parasites

For the Nattamare Parasites, you will need to complete the Wolf Dungeon and the Bear Dungeon. Additionally, the Nokken Dungeon contains items required to complete the Wolf and Bear ones. Do everything you can in the game currently for these items, and refer to our complete guide if you’re stuck on anything!
Ram Skull

Chances are, you already have the Ram Skull in your inventory but, if you don’t, head to The Mountain Plateau. From there, climb up the wall to the left, then head into the cave you illuminated with a torch to grab the Patterned Disc for the Bear Dungeon.
Next, walk through the cave and follow it out to a giant bird’s nest. The Ram Skull will be inside the nest. Pick it up and store it in your inventory until a bit later.
Mother Kroke’s Beard Hair

Obtaining Beard Hair from a Mother Kroke is one of the more complex items to get for the mask, so buckle in for this one as it will take a while. There are three young Krokes that you must return the mother for her to let you take a piece of her beard hair.
However, before that, let’s go over how you summon the Mother Kroke in the first place. Head to the Poisoned Forest and proceed to take the south exit, heading towards the mill. Once in the following area, you will see a dig spot. Use your trowel to dig up some ancient currency, then continue east towards the mill.

With the coins in your inventory, walk through the mill and onto the stone wall leading to the Waytree. You will see a climbable path that leads down the stone wall. Climb down the wall and walk towards the river. Open your inventory and toss the ancient coins into the water to summon Mother Kroke.

Once Mother Kroke gets summoned, head back to the Poison Forest and go to the purple water. You will see one of the three young Krokes swimming in the water. Use the lobster trap you obtained from the Nokken Dungeon to capture it. If you didn’t pick the lobster trap up, you can head back to the Nokken’s lair and grab it.

Next, head to the cemetery in front of the Forgotten Church via its Waytree. Now, walk to the right until you encounter a shack with a Horse Head on the outside wall. Head inside and use your mallet on the peg to the right. The Horse Head will now be on the ground outside, go back out and grab it.

From there, make your way to Trollhulde’s home near the mill. There will be another young Kroke there that is being held captive by the troll. Swap the Horse Head with the Kroke to obtain two out of three Krokes.

Before leaving Trollhulde’s home, look for a trail of slime on the ground. Follow it from left to right until you see a slug. Pick the slug up and head to the Mother Tree.

Following that, head to the Sunken Cabin located beside Trollhilde’s bridge, where you obtained the beartrap at the start of the chapter. Once inside the cabin, climb down the leader and make your way to the back of the room. There will be the last Kroke hiding inside of a bucket, and offer it the slug to have it jump into your inventory.

With all three Krokes in your inventory, make your way back to the Mother Kroke. Next, give all three of them to her, prompting her to offer you her beard hair. Use your dagger to cut a piece of her beard off, giving you the required item.
Crafting the Mask of Invisibility

With the Mother Kroke’s Beard Hair, Ram Skull, and two Nattamare Parasites in your inventory, head back to Shroomi’s Laboratory in the Poisoned Forest. Throw all the items into the pot to have Shroomi craft you the Mask of Invisibility.
Obtaining The All-Seeing Mask

Once Shroomi gives you the Mask of Invisibility, he will provide you with another list of ingredients he needs to craft the All-Seeing Mask. The ingredients are 3 Bluecap Toadstools, an Owl Skull, a portion of a Newt Spawn, and an Eye-Orb Fungus. All of which are found within the Poisoned Forest, which is excellent.
Next, after Shroomi teaches you how to activate and use your new invisibility powers, head outside his laboratory to start searching for the required items for the second mask. We will show you how to get each ingredient below.
Eye-Orb Fungus

The first item you want to grab is the Eye-Orb Fungus, to the right of the purple water in the Poisoned Forest. You will see a purple-ish eye in between the water and a doorway. Use your invisibility to walk up to the eye and snatch it from its confinement.
Newt Spawn

There will be a door directly to the right of the eye you harvested for the Eye-Orb Fungus. Head through it while remaining invisible. You will see a patch of dirt on the ground with white growth on the top of it. Walk over to it and use your empty jar to scoop it up, which will store the Newt Spawn in your inventory. Remain in this area for the next step!
Bluecap Toadstools

From where you gathered the Newt Spawn, head to the back left corner of the area. There will be a Bluecap Toadstool here, beside a long root protruding from the ground. Pick the toadstool up, then head back to the central hub of the Poisoned Forest.

Once back at the Poisoned Forest’s hub, look for the northmost exit in the center of the area. Head inside, while invisible, to see a large Stag in the distance. Walk up the steps and look right until you another Bluecap Toadstool just before the end of the stairs. Snag it and head back to the central hub.

There will be mushrooms that form a ramp leading to a doorway on the northwest side of the hub. Walk up the mushrooms, while invisible, to get to the next area. Next, look for red vines blocking a small cave to the right. Cut them down with your dagger and retrieve the last Bluecap Toadstool. Remain in the same area for the final item.
Owl Skull

After grabbing the final Bluecap Toadstool, follow the stone path up an incline where you’ll see the second group of red vines. Destroy the vines with your dagger to reveal the Owl Skull. Pick the skull up, then head back to Shroomi’s Laboratory.
Crafting The All-Seeing Mask

With the three Bluecap Toadstools, the Owl Skull, Newt Spawn, and Eye-Orb Fungus in your inventory, mix them all into Shroomi’s cauldron in his laboratory. Shroomi will then craft the All-Seeing Mask for Tove and explain how to use it.
Obtaining The Three Nattabloom Fungi

Once you receive the All-Seeing Mask from Shroomi, he will post one give Tove one final batch of ingredients to find, which are three Nattabloom Fungi. To kickstart the task, exit the laboratory and head back to the area you grabbed the Owl Skull. There will be a purple structure with holes through it beside the ramp.
Equip your All-Seeing Mask to reveal a fairy, Alva, trapped inside the purple structure. Alva will then give you a task to retrieve its magic wand from its house, which is “located by a tree.” While not very descriptive, go to the next step for its exact location.
Finding Alva’s Magic Wand

Head to the central area of the Poisoned Forest and equip the All-Seeing Mask. Now, head over to the purple water to see a hidden pathway above the water. Follow it to the top, then switch to the Mask of Invisibility to get past the door.

When in the following area, switch back to the All-Seeing Mask and head over the mushroom bridge. You will then see an incline with a house at the top, which is Alva’s. Walk up the slope, retrieve the magic wand from the house, and then make your way back to where Alva is trapped.

Use the magic wand on the object that has Alva trapped to make it larger, allowing Alva to escape. After a quick conversation, Alva tells Tove to keep the wand as a parting gift, then flies off. From there, remain in the area for the next step.
How To Get The Three Natabloom Fungi

After freeing Alva, walk up the ramp on the left and cross over the object you enlarged earlier. Once on the other side, equip the Mask of Invisibility and continue forward until you reach a dead end.

Next, switch to the All-Seeing Mask to reveal a winding pathway leading through the trees and follow it up. You will reach a point where the path ends but see mushrooms growing out of the trees on the right. Using the magic wand, enlarge the mushroom to continue up the trees.

Continue enlarging the mushrooms until you reach the Natabloom Fungi and cut a piece of it off with your dagger. After that, make your way back down the tree, stopping once you get to the ground for the next step.

Once you’re back on the ground, head left until you see a group of small mushrooms in a circle. Switch to the All-Seeing Mask to reveal a patch of snow that appears to be softer than the rest. Go over to it and interact with the patch of snow to reveal a secret pit.

Climb down into the pit to see an enormous mushroom. Using your magic wand, shrink the mushroom, then use the trowel to dig it out of the ground and into your inventory. From there, you can climb out of the pit and make your way back to the central hub of the Poisoned Forest.

Once you arrive back at the central hub, go by the mushroom ramp that leads into the area you just were. However, this time, use your magic wand on the mushroom ramp to shrink it. Now, using your trowel, dig up the mushroom and store it in your inventory for a bit later.

With the mushroom ramp in your inventory, head back through the doorway beside the eye (where the Newt Spawn was). Once inside, switch to your All-Seeing Mask and cross a mushroom bridge. Once on the other side, you will see a dirt patch with a mushroom in it. Use your trowel to dig the mushroom out and into your inventory.

From there, follow the ramp up until you reach a patch of dirt towards the edge of the cliff. Open your inventory and plant the mushroom ramp into the soil, then use your magic wand to expand it back to its original size. Walk up the mushroom ramp to the second Natabloom Fungi and cut a piece of it off with your dagger. After that, make your way back to the central hub of the Poisoned Forest for the next step.
When you arrive back at the central hub, switch to the All-Seeing Mask and make your way up the path above the toxic water once more. Once in the following area, put the All-Seeing Mask back on and cross the bridge. There will be a small patch of dirt with a mushroom in it. Use your trowel to dig it out, adding it to your inventory.

Next, turn around, cross the bridge, and head to the three dirt piles near the trees. You should have three mushrooms in your inventory, one for each dirt pile. Going from left to right, you want to plant the largest mushroom on the far left, the medium mushroom in the middle, and the smallest mushroom on the far right. After that, enlarge all of them to make a bridge.

Following that, make your way across the bridge once more, head up the incline, and then cross the mushroom bridge you just created to reach the final Natabloom Fungi. There will be small gaps between each mushroom you planted. Use your wand to enlarge the mushrooms growing from the trees on the right to cross over the holes.

Once you reach the Natabloom Fungi, use your dagger to cut a piece of it off, then head back to Shroomi’s Laboratory. Toss all three Natabloom Fungi into the cauldron to have Shroomi whip up an antidote for the diseased forest.
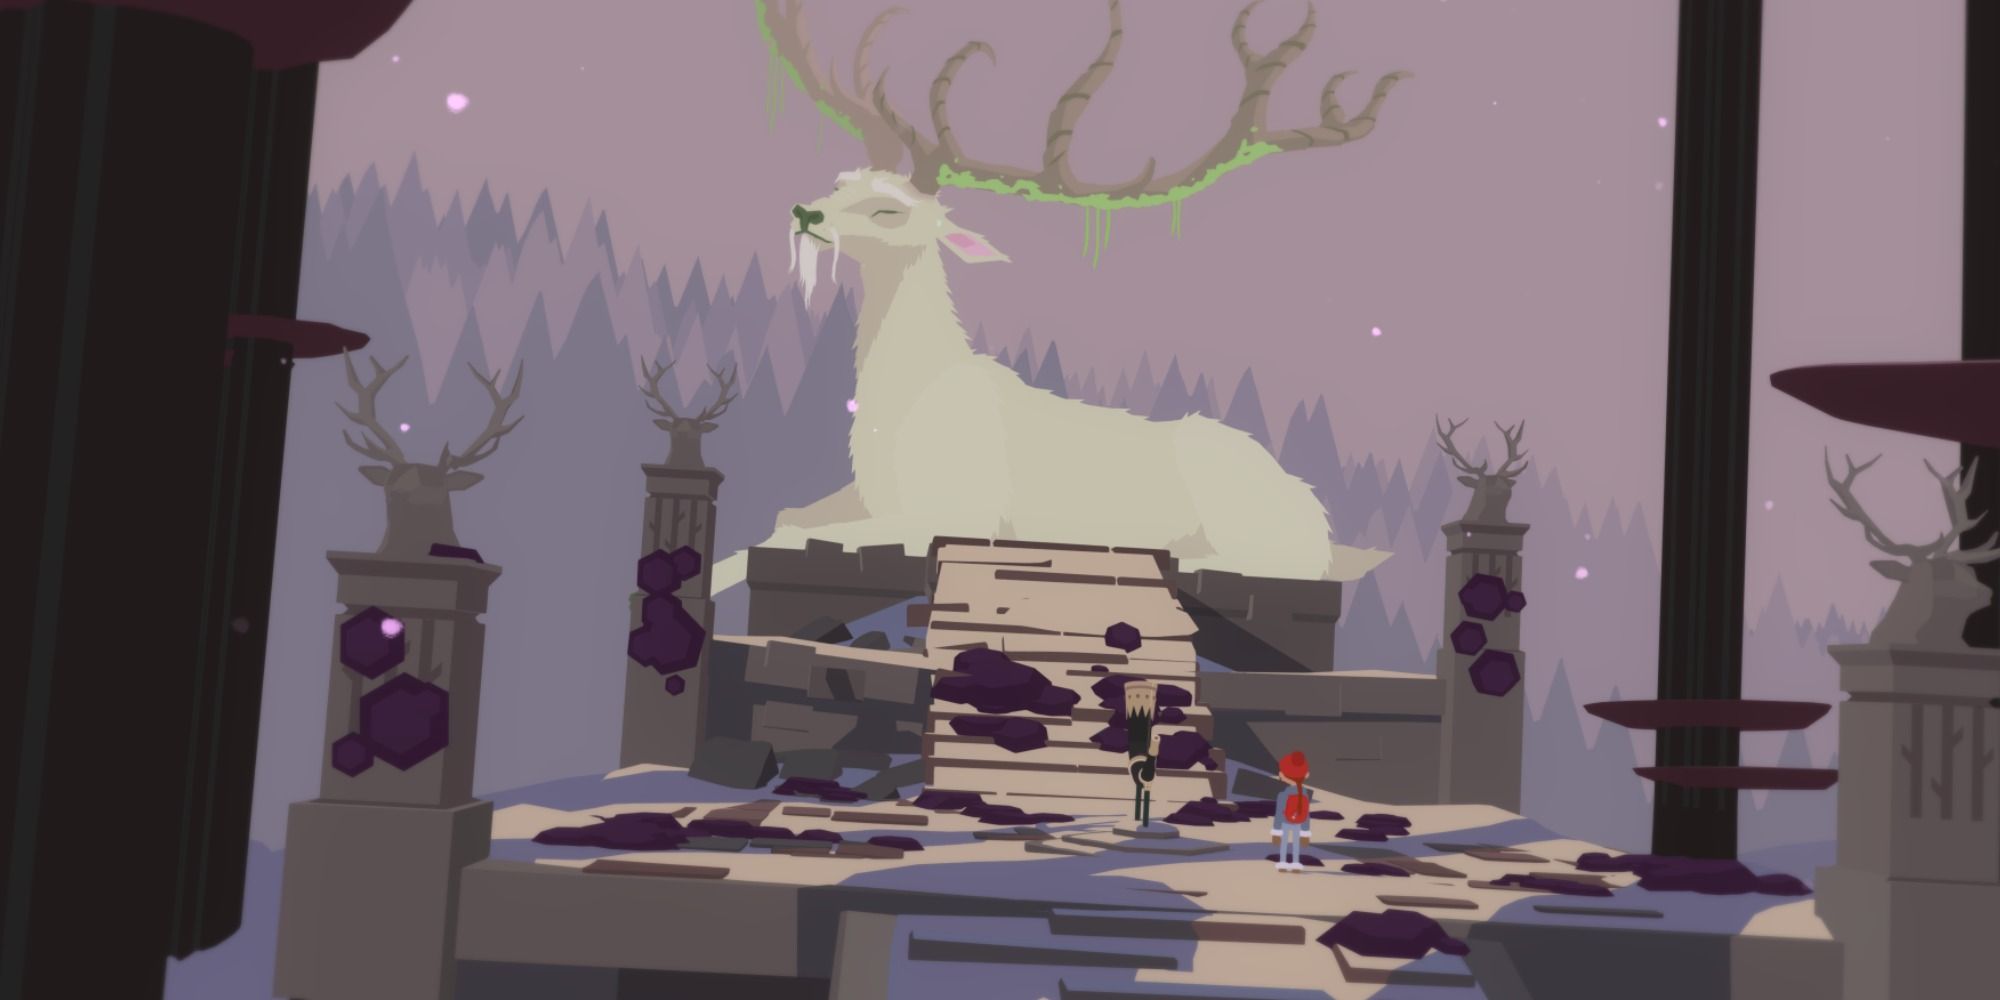
The Stag Dungeon Walkthrough

Once you have the antidote from Shroomi, head to the large white Stag you encountered briefly earlier. There will be a horn surrounded by disease and mushrooms. Open your inventory and apply the antidote to your dagger, then use the dagger to stab deep into the disease to cure it.

You will now get transported into a vision and will be in your house. One of the first things you’ll notice is a doormat in the middle of the floor. Head over to it and pick it up to reveal a little sapling underneath.

Next, head over to the refrigerator, open it up and grab the bag of fertilizer. From there, walk back over to the sapling and apply the fertilizer to it.

After that, head outside and head to the left and past the parked car. You will see a watering can beside a post, grab it, then make your way towards the well.

When you’re at the well, use the watering can on it to fill it with water.

Head back inside the house and water the sapling with the water you obtained from the well, causing it to sprout into an enormous tree.

You will notice a blue-bricked wall surrounded by what appears to be a doorframe with a cabinet beside it. Go to the drawer and take the handle from it.

From there, walk left until you see Tove’s diary sticking out of a pile of dirt. Take the padlock from the journal.

Go back to the brick wall, place the doormat from earlier in front of it, and then slide the mat over to reveal a key.

Next, put the cabinet handle and the diary padlock on the wall to create a door, then unlock it with the key to enter a new area.

Before heading back out the door, look to the corner on your right to see a cat’s water bowl. Open your inventory and fill the watering can from earlier with the water from the bowl. Then head out the door and walk to the right.

There will be another root protruding from the side of the tree. Use the watering can on the sapling to spawn in a whole other area to explore.

Head to the right to find two climbing points, use the one on the right and take it to the top. You will see a cupboard there. Open it up to see an evil eye stare back at you, causing the door to fall off its hinges. Pick the cupboard’s door up and store it in your inventory.

Climb down to the starting area, then take the left climbing point to the top this time around. Once at the top, head to the left until you reach a gap. Use the cupboard door to make a bridge, allowing you to cross over to the other side of the tree.

Now, head to the left until you see Tove’s dad working on a car. There will be a paintbrush in his toolbox. Pick the paintbrush up, and continue to the next step.

From there, look for a climbing point that leads down the tree’s trunk. Take it down, then head right. You will see a screwdriver sticking into a blue scarf. Take the screwdriver, which will cause the scarf to drop a little, creating a shortcut.

Next, climb down the scarf and head right until you see your dad painting a crib. You will notice that, instead of a paintbrush, he’s using a crayon. Hand him the paintbrush you grabbed earlier and take the crayons off the floor afterward.

From there, continue going right until you reach the climbable trunks. Take the right one and climb off on the middle platform. Young Tove will be drawing on the table but with knitting needles. Hand her the crayons in exchange for the knitting needles.
After grabbing the knitting needles, you can also grab an orange rubber ring. Take that as well!

Now, head back to the blue scarf and take it up. From there, head left to see your mother on a rocking chair with a wrench. Give her the knitting needles in exchange for the wrench.
Once you have the wrench, your mom will also drop a blue rubber ring. Grab it as well!

With that out of the way, climb to the top of the tree and head left. Place the screwdriver in the toolbox, which will erase the roots blocking the pathway to your dad.

Next, exchange the wrench with the can of paint from your dad, which will also have him give you the yellow rubber ring. Make sure you have both items before moving forward.

Head back down the tree and to the crib. Place the paint can on the pile of newspapers on the left to eliminate the roots in the area. Now, walk up to the crib and grab the green rubber ring.

Finally, head back through the door and approach the cone on the floor. You will now place the rubber rings on the cone in the following order, Blue, Green, Yellow, and Orange. Once that’s done, a cutscene will play out, which will eventually kick Tove out of the memory.
The Stag is no longer diseased, and another cutscene will play out. The Bear, Wolf, and Stag will open the portal, allowing Tove to travel to the castle. Thus, officially ending the second chapter of Roki!
Link Source : https://www.thegamer.com/roki-stag-dungeon-walkthrough/