
Skyrim: Deathbrand Quest Walkthrough
Table of Contents
Here’s everything you need to know to obtain the Deathbrand armor set in Skyrim.
You Are Reading :Skyrim Deathbrand Quest Walkthrough

Quick Links
There are dozens of unique quests to complete on the island of Solstheim, and they’re all exclusive to The Elder Scrolls V: Skyrim’s Dragonborn DLC. “Deathbrand” is one of the most notable side quests on Solstheim because of the many rewards you earn from it.
You stand to gain a powerful armor set and piles of gold by completing “Deathbrand,” so it’s worth learning everything you can about this quest before starting it. Here’s a full guide for how to start the “Deathbrand” quest, find every piece of the Deathbrand Armor set, and complete Gyldenhul Barrow.
How To Start The “Deathbrand” Quest

To start “Deathbrand,” you’ll need to reach level 36 and then read a copy of the Deathbrand book. You can find this book inside the bedroom in the Raven Rock Temple or next to the bed in the Tel Mithryn Steward’s House. The Raven Rock Temple is in Raven Rock, the city you encounter when you first travel to Solstheim. Tel Mithryn is on the southeastern side of Solstheim, as you can see on the map above.

You can also find a copy of Deathbrand inside the Greathall in Skaal Village. Once you read the book, you’ll start the “Deathbrand” quest. Next, you’ll need to find every piece of the Deathbrand Armor set, which you can find out more about below.
How To Get Every Piece Of The Deathbrand Armor Set
After you start the “Deathbrand” quest, you’ll need to find all four pieces of the Deathbrand Armor. Each of the armor pieces is at a different location, so here are guides about where to find each piece and its unique effects.
Deathbrand Helm

Effect: +100 Armor Rating While Wearing Every Piece Of The Deathbrand Armor Set, You Also Gain The Ability To Breathe Underwater
You can find the Deathbrand Helm in a chest at Haknir’s Shoal. This location is north of the Wind Stone. The chest has an expert-level lock, so you need to bring lockpicks to open it. You’ll also encounter two Pirates, so prepare for a short fight before you attack them.
Deathbrand Armor

Effect: Every Piece Of Deathbrand Armor You Equip Grants You +15 Stamina
The next piece of armor is the Deathbrand Chestplate, which is directly north of the Earth Stone. The chest you should look for is on the beach, and there are two Reavers nearby. The chest is next to a tree and has an adept-level lock.
Deathbrand Boots

Effect: Each Deathbrand Armor Piece You Equip Increases Your Maximum Carry Weight By Ten Points
The Deathbrand Boots are in a chest with an expert-level lock at the bottom of a cliff. The chest is west of Tel Mithryn, as you can see on the map above. You’ll encounter Ash Spawn enemies around the chest, so prepare for a fight.
Deathbrand Gauntlets

Effect: One-Handed Damage Is 10% Higher While Dual-Wielding Per Each Piece Of Deathbrand Armor You Equip
The Deathbrand Gauntlets are in a chest next to a waterfall along the coast of Solstheim. Like the other chests, this container has an adept-level lock you must pick before opening it. There are Mudcrabs in the area, but luckily, they’re relatively weak compared to the previous enemies you’ve faced.
Clear Gyldenhul Barrow
When you open the final chest in the search for the Deathbrand Armor, you’ll also find the key to Gyldenhul Barrow. Travel to the location with the quest marker and open it using the key. Next, walk inside, and you’ll encounter Stalhrim that you have to mine to continue. You need an Ancient Nordic Pickaxe, which you can purchase from Baldor Iron-Shaper in the Skaal Village.
Once you have an Ancient Nordic Pickaxe, head back to Gyldenhul Barrow and mine through the Stalhrim. The next room you’ll enter contains a lot of treasure. Piles of gold scatter the ground, so pick them up before continuing. Additionally, there are many expensive items to loot in this room, such as potions and gems.

Once you have everything you want, continue through the large door at the end of the room, which opens once you pick up an item. This room is where you’ll encounter your final challenge of the “Deathbrand” quest, Haknir Death-Brand.
Travel towards the east side of the room and find Haknir’s skeleton. There’s a chest nearby with random loot. Pick up the Bloodscythe weapon behind Haknir’s skeleton, and his ghost will spawn.
How To Defeat Haknir Death-Brand

Once Haknir Death-Brand’s ghost spawns, you have to defeat him to finish the quest. Haknir deals melee damage, and he’ll disappear occasionally. When he disappears, you need to defeat another ghost, which will be one of his former crew members. Continue damaging Haknir and defeat the secondary ghosts as they come, eventually taking away all of his HP.
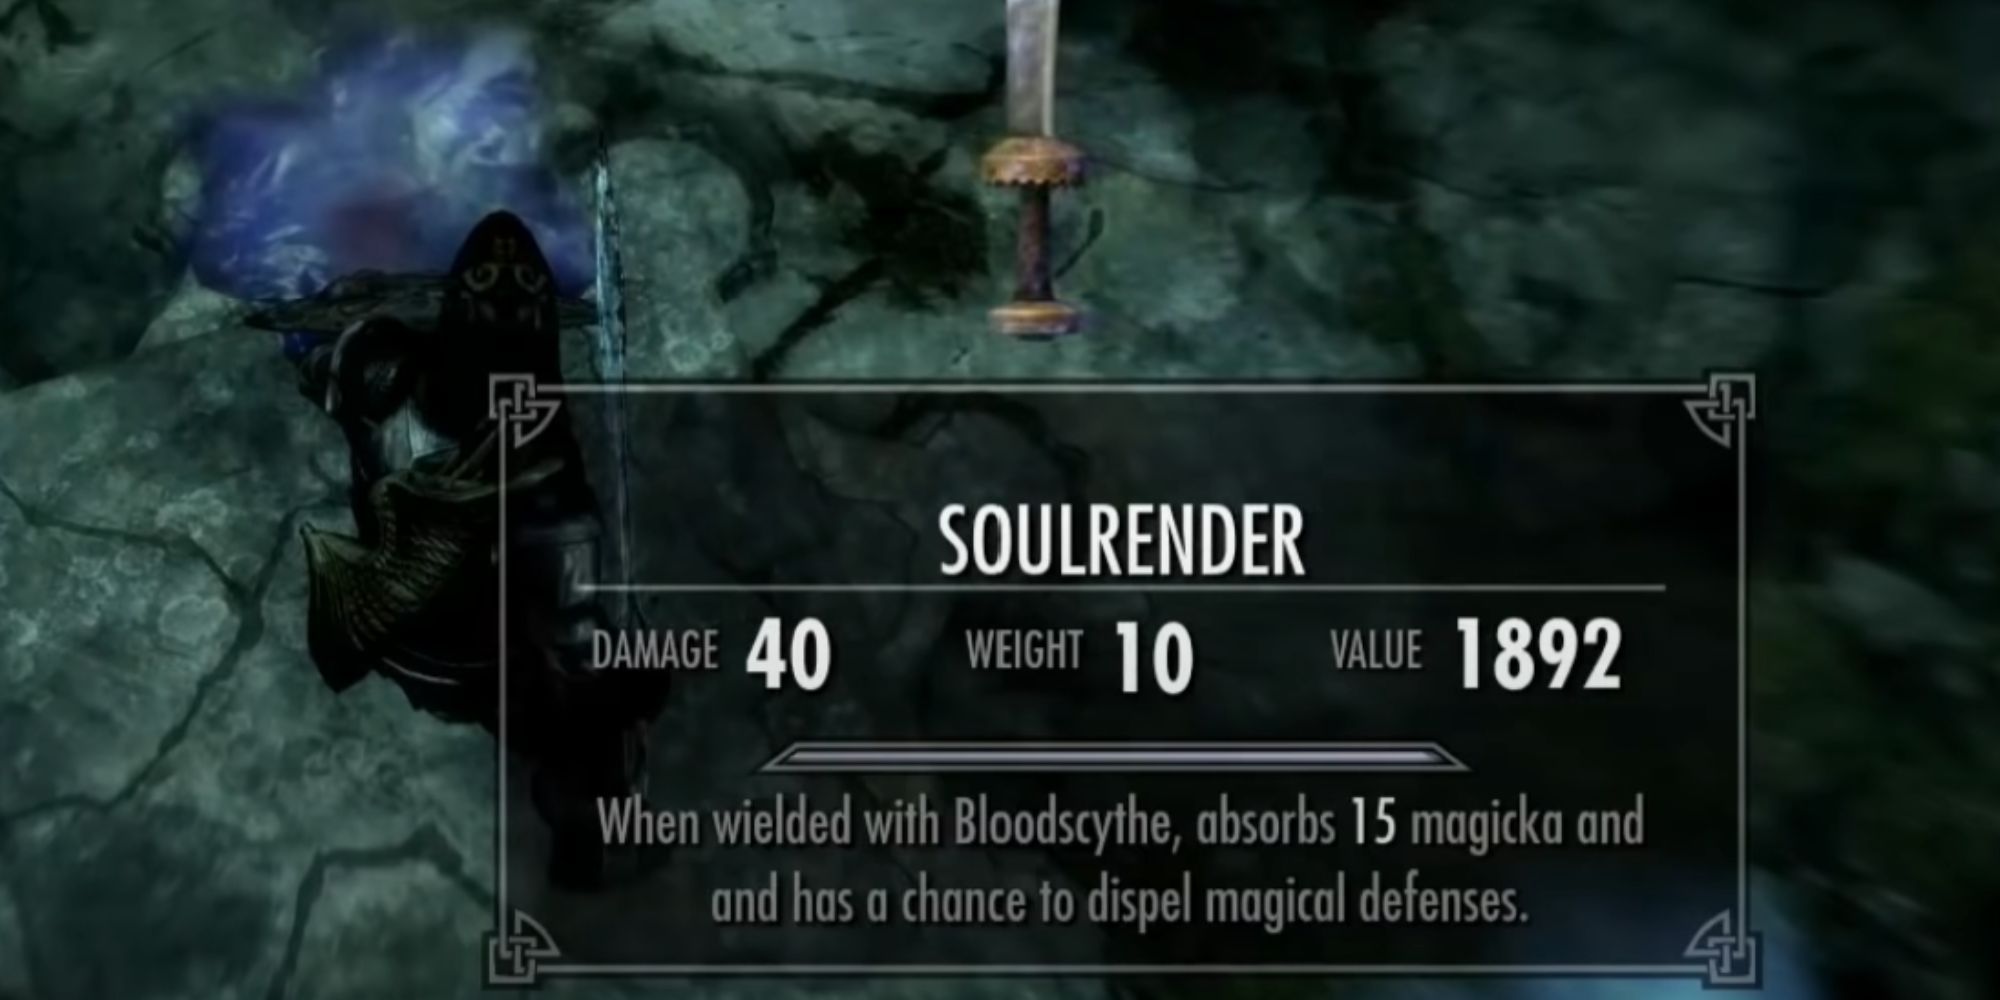
Once you send Haknir Death-Brand back to his grave, you can loot the Soulrender weapon from his ghostly remains. If you equip the Bloodscythe and Soulrender weapons at the same time, then they’ll lower an enemy’s magicka resistance, weaken an enemy’s armor, absorb 15 points of HP, and absorb 15 magicka from enemies they hit. The “Deathbrand” quest will conclude once Haknir dies, and you can then leave Gyldenhul Barrow.
Link Source : https://www.thegamer.com/skyrim-elder-scrolls-deathbrand-quest-walkthrough/